In a previous section, we introduced ways to apply an explicit transformation to a model's texture coordinates, with methods like setTexOffset() and setTexScale(). In addition to this explicit control, Panda3D offers a simple mechanism to apply an automatic texture transform each frame, as computed from the relative transform between any two nodes.
nodePath.setTexProjector(textureStage, fromNodePath, toNodePath)
|
When you have enabled this mode, the relative scene-graph transform
from fromNodePath to toNodePath--that is,
the result of fromNodePath.getTransform(toNodePath)--is
automatically applied as a texture-coordinate transform to the
indicated textureStage. The result is more-or-less as if you executed
the following command every frame:
nodePath.setTexTransform(textureStage, fromNodePath.getTransform(toNodePath))
|
There is no need for either fromNodePath or
toNodePath to have any relation to the nodePath that is
receiving the setTexProjector() call; they can be any two
arbitrary NodePaths. If either of them is just
NodePath(), it stands for the top of the graph.
This has several useful applications. We have already introduced
one application, in conjunction
with MWorldPosition, to move the generated texture
coordinates from the root of the graph to the model itself.
Interval-animated texture transforms
Another handy application for a TexProjector is to enable the use of
the various LerpIntervals to animate a texture
transform. Although there are no LerpIntervals that directly animate
texture transforms, you can make a LerpInterval animate a
NodePath--and then set up a TexProjector effect to follow that
NodePath. For example:
smiley = loader.loadModel('smiley.egg')
lerper = NodePath('lerper')
smiley.setTexProjector(TextureStage.getDefault(), NodePath(), lerper)
i = lerper.posInterval(5, VBase3(0, 1, 0))
i.loop()
|
Note that you don't even have to parent the animated NodePath into the
scene graph. In the above example, we have set up the interval
i to repeatedly move the standalone NodePath
lerper from position (0, 0, 0) to (0, 1, 0) over 5
seconds. Since smiley is assigned a TexProjector that
copies the relative transform from NodePath() to
lerper--that is, the net transform of
lerper--it means we are really animating the texture
coordinates on smiley from (0, 0) to (0, 1) (the Z
coordinate is ignored for an ordinary 2-D texture).
Projected Textures
Another useful application of the TexProjector is to implement
projected textures--that is, a texture applied to geometry as
if it has been projected from a lens somewhere in the world, something
like a slide projector. You can use this to implement a flashlight
effect, for instance, or simple projected shadows.
This works because the TexProjector effect does one additional trick:
if the second NodePath in the setTexProjector() call
happens to be a LensNode, then the TexProjector automatically applies
the lens's projection matrix to the texture coordinates (in addition to applying the relative transform between the nodes).
To implement projected textures, you need to do three steps:
1. Apply the texture you want to the model you want to project it
onto, usually on its own TextureStage, so that it is multitextured.
2. Put the MWorldPosition TexGen mode on the model. This
copies the model's vertex positions into its texture coordinates, for
your texture's TextureStage.
3. Call model.setTexProjector(textureStage, NodePath(),
projector), where projector is the NodePath to
the LensNode you want to project from.
For your convenience, the NodePath class defines the following method
that performs these three steps at once:
nodePath.projectTexture(textureStage, texture, lensNodePath)
|
For instance, we could use it to project the bamboo texture
("envir-reeds.png") onto the ripple.egg model, like this:
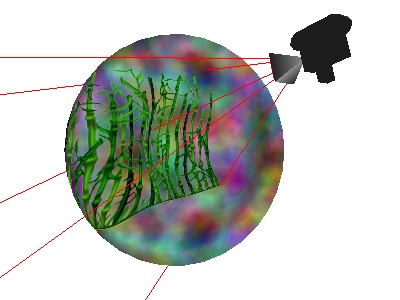
You could move around the projector in the world, or even change the
lens field of view, and the bamboo image would follow it. (In the
above image, the camera model and the projection lines are made
visible only for illustration purposes; normally you wouldn't see
them.)
This image was generated with the following code (excerpted; click on
the image for the complete program):
ripple = Actor.Actor('ripple.egg')
ripple.reparentTo(render)

proj = render.attachNewNode(LensNode('proj'))
lens = PerspectiveLens()
proj.node().setLens(lens)
proj.reparentTo(render)
proj.setPos(1.5, -7.3, 2.9)
proj.setHpr(22, -15, 0)

tex = loader.loadTexture('maps/envir-reeds.png')
ts = TextureStage('ts')
ripple.projectTexture(ts, tex, proj)
|
|