When you start applying more than one texture at a time, it becomes important to control how the textures combine together. There are several options, and they are controlled through the TextureStage object, specifically through the TextureStage.setMode() call.
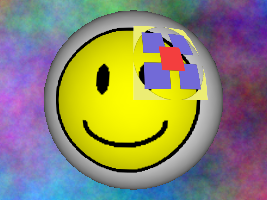
Let's go back to the example of applying a texture to the smiley model. In this case, we'll create a new TextureStage to apply the following texture image:
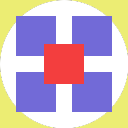
To this scene:

Note that the circular white part of the sample image is actually not white at all, but an alpha cutout (you are seeing through the image to the white page background). We have rendered smiley.egg against a colored background so you can see the effects of alpha in the various modes below; in some of them, the alpha is propagated through to the final color, so smiley is transparent in those parts of the image, but in other modes, the alpha is used for a different purpose, and smiley is not transparent there.
Note also that, for the purposes of illustration, we have only applied the sample texture image to a portion of the smiley model, rather than to the whole model. (This was done by transforming the texture coordinates of this texture stage, which is covered in a later topic.)
Modulate mode
This is the default blend mode. In this mode, the top texture color is multiplied by the bottom texture color to produce the result. This means the resulting texture color will be darker (or at least, no brighter) than both of the original texture colors.
ts = TextureStage('ts')
ts.setMode(TextureStage.MModulate)
smiley.setTexture(ts, tex)
|
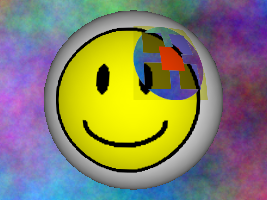
Note that in this mode, an alpha cutout in the top texture produces an alpha cutout in the resulting image.
Add mode
In this mode, the top texture color is added to the bottom texture color, and clamped to 1 (white). This means the resulting texture color will be brighter (or at least, no darker) than both of the original texture colors.
ts = TextureStage('ts')
ts.setMode(TextureStage.MAdd)
smiley.setTexture(ts, tex)
|
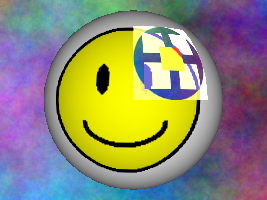
Note that in this mode, as in modulate mode, an alpha cutout in the top texture produces an alpha cutout in the resulting image. Also note that, unless one or both of your source textures was rather dark, there is a tendency for the colors to get washed out at white where everything clamps to 1.
Replace mode
In this mode the top texture completely replaces the bottom texture. This mode is not often used.
ts = TextureStage('ts')
ts.setMode(TextureStage.MReplace)
smiley.setTexture(ts, tex)
|
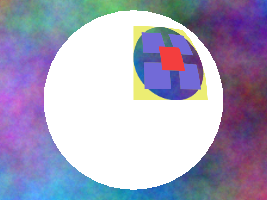
Note that the alpha cutout is preserved, but the effects of lighting (which are considered part of the underlying texture) have been lost.
Decal mode
In this mode the top texture completely replaces the bottom texture, but only where alpha = 1 in the top texture. When alpha = 0, the bottom texture shows through, and there is a smooth blending for alpha values between 0 and 1.
ts = TextureStage('ts')
ts.setMode(TextureStage.MDecal)
smiley.setTexture(ts, tex)
|
Note that the alpha cutout is no longer preserved in this mode, because alpha is used to determine which texture should be visible. Also note that the effects of lighting are lost for the decalled part of the texture.
Panda3D also provides a built-in decal capability, for rendering a small polygon coplanar with and embedded within a larger polygon, which is not related to the decal texture blend mode.
Blend mode
Blend mode is similar to decal mode, except you can specify the color of the decal as a parameter at runtime. You can vary the color and you don't have to have a different texture image prepared for each possible color. However, the decal will always be monochromatic (it will be drawn in different shades of whatever color you specify).
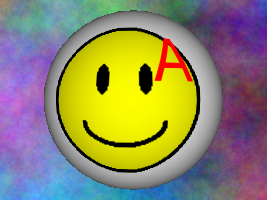
Blend mode can only be used with a grayscale texture, and it does not use alpha. Since the sample texture above is not a grayscale texture, we will use a different texture for this example:

This texture does not have an alpha channel; it is simply a grayscale image with a large white "A" on a field of black. Blend mode will produce the original color where the image is black, and the color we specify with TextureStage.setColor() where the image is white. Where the image is shades of gray, there will be a smooth blending between the colors.
ts = TextureStage('ts')
ts.setMode(TextureStage.MBlend)
ts.setColor(1, 0, 0, 1)
smiley.setTexture(ts, tex)
|
And we can change the color of the decal at will, simply with:
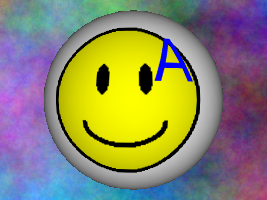
Note that, as with the decal example above, the lighting information is lost where the decal is applied.
|